A Google Forms ticketing system is a practical first step when you need to track requests, you already use Google Workspace, and you are not ready to pay for a help desk tool. You can use Google Forms for intake, Google Sheets for the queue, and Apps Script for email notifications.
Template: Make a copy of the free Google Forms ticketing system template.
This guide shows you how to create a ticketing system in Google Forms without pretending it can do everything a real help desk does. By the end, you will have a working Forms-based setup with ticket IDs, status tracking, assignee routing, email confirmations, basic triage, and a clear sense of when the DIY version stops saving time.
If you are still defining the basics, read what is a ticketing system first.
Can You Use Google Forms as a Ticketing System?
Yes, you can use Google Forms as a ticketing system if you are a small team handling a manageable request volume.
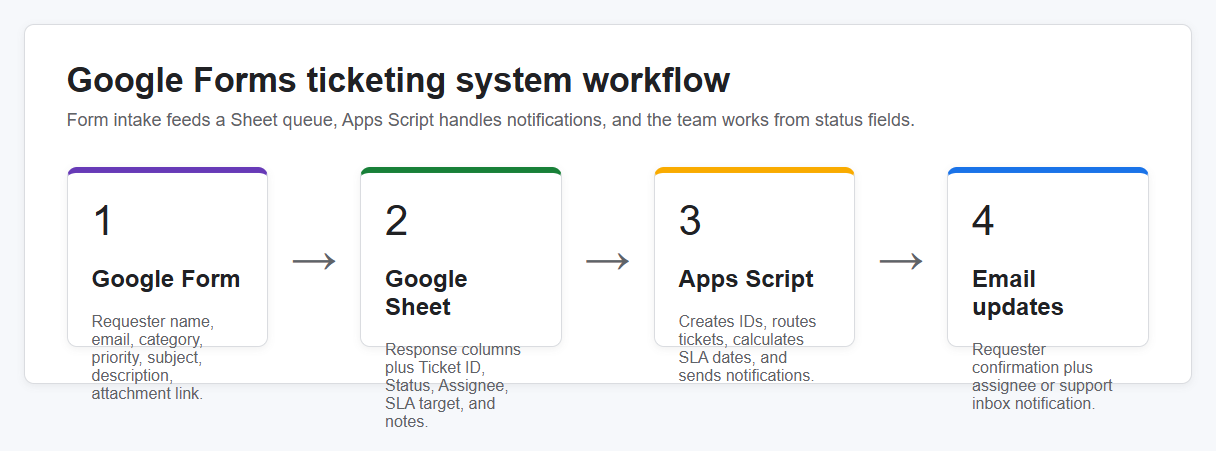
What you are actually building is a lightweight Google ticketing system:
Google Form for intake → Google Sheet for the ticket log → Apps Script for notifications and basic automation
That is enough for many internal IT, HR, facilities, school support, nonprofit ops, and startup admin workflows. It is not a full help desk. It will not give you proper SLA reporting, private agent notes, audit logs, requester portals, collision detection, asset linking, or role-based permissions.
The honest answer is: yes, with caveats. A ticketing system using Google Forms is useful when the alternative is scattered emails and chat messages. It becomes painful when your team needs stronger ownership, reporting, workflow control, and requester visibility.
What You’ll Need Before You Start
You need a Google account. A Google Workspace account is better because it gives you cleaner email collection, shared ownership, and domain controls. A free Gmail account can work for a tiny setup, but you are more likely to run into permission, ownership, and email-sending limits.
Create a shared Google Drive folder before you start. Put the Form, linked Sheet, template notes, and any uploaded attachments there so the system does not depend on one person’s personal Drive.
Plan for 30 to 45 minutes if you follow the steps in this guide. You do not need to be a developer. The Apps Script section is copy and paste, but you should be comfortable changing field names and email addresses.
You may see older search terms like Google apps ticketing system, Google apps help desk ticketing system, or Google apps support ticket system. In this article, those all mean roughly the same DIY setup: Google Forms, Google Sheets, and Apps Script.
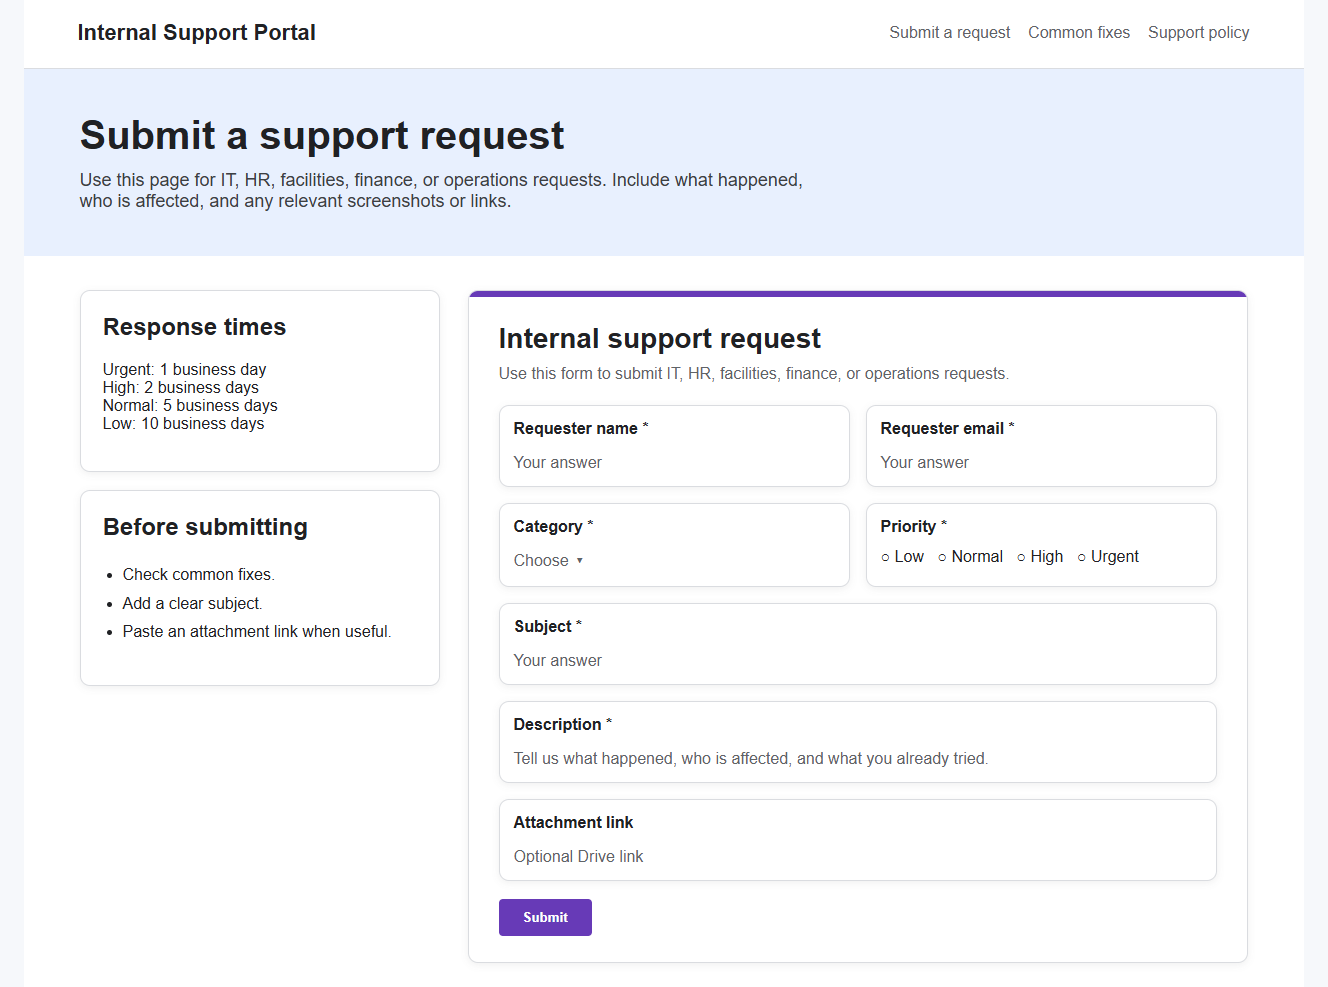
Step 1 — Create the Google Forms Support Ticket System Intake Form
Start by creating a blank Google Form.
Give it a plain title, such as:
- Internal support request
- IT help desk request
- Submit a ticket
- Employee support request
Avoid clever names. The person submitting the request should know immediately that this is where support requests go.
Add a short description:
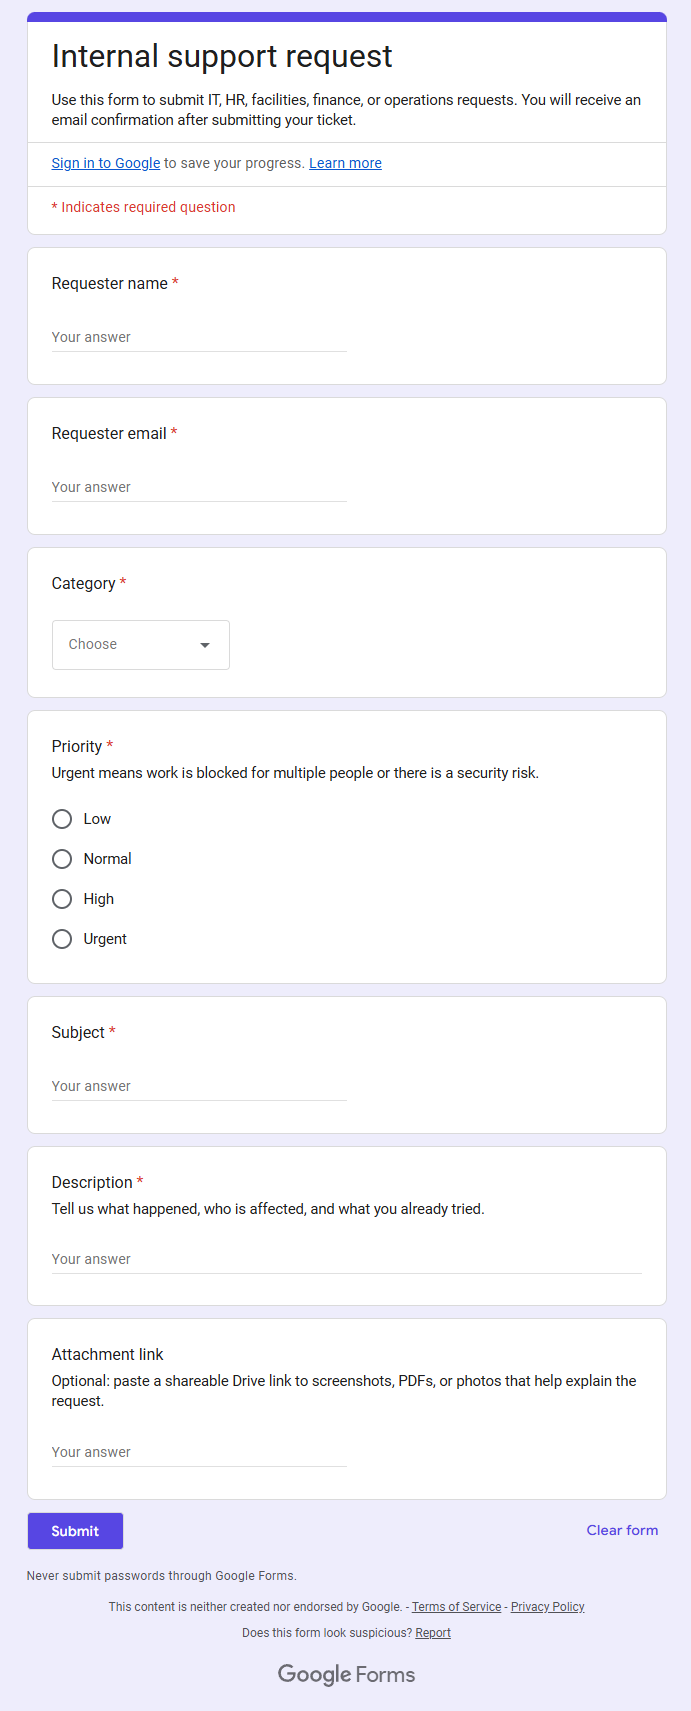
Use this form to submit IT, HR, facilities, finance, or operations requests. You will receive an email confirmation after submitting your ticket.
Now add the fields your team actually needs.
A practical Google Forms support ticket system should include:
Requester name
Use a short-answer field.
Requester email
If you are using Google Workspace, collect verified email addresses in the form settings. If external users or non-Google accounts will submit requests, add a required short-answer email field instead.
Category
Use a dropdown or multiple-choice field. Start with a short list:
- IT
- HR
- Facilities
- Finance
- Operations
- Other
Do not create 30 categories on day one. More choices usually means more wrong choices.
Priority
Use multiple choice:
- Low
- Normal
- High
- Urgent
Add a description if people tend to mark everything urgent. For example: “Urgent means work is blocked for multiple people or there is a security risk.”
Subject
Use a short-answer field. This becomes the quick summary of the ticket.
Description
Use a paragraph field. Add helper text like: “Tell us what happened, who is affected, and what you already tried.”
Attachment
Use a file upload field if screenshots, PDFs, or device photos help your team troubleshoot. File uploads can add sign-in and permission complexity, so test this before using the form with external requesters.
Google Forms automatically records the submission timestamp in the response Sheet, so you do not need to ask people for the date and time.
Use required fields sparingly. Name, email, category, priority, subject, and description are usually enough. Too many required fields make people abandon the form or submit weak answers just to get through it.
Step 2 — Connect the Form to a Google Sheet
Next, connect the form responses to Google Sheets.
In Google Forms, open the Responses tab and choose the Sheets icon or the option to select a destination for responses. You can create a new spreadsheet or select an existing one. Google’s official help page on where to save form responses is the best reference if the UI changes after this article is updated.
Name the Sheet something clear:
- Tickets — Live
- Internal support tickets
- Help desk ticket log
- Employee request tracker
Each form submission creates a new row. Each form question becomes a column.
At this point, your Sheet is only a response log. To make it work as a Google ticket system, add operational columns to the right of the form response columns:
- Ticket ID
- Status
- Assignee
- SLA target
- Resolved date
- Internal notes
- Last updated
- Resolution email sent
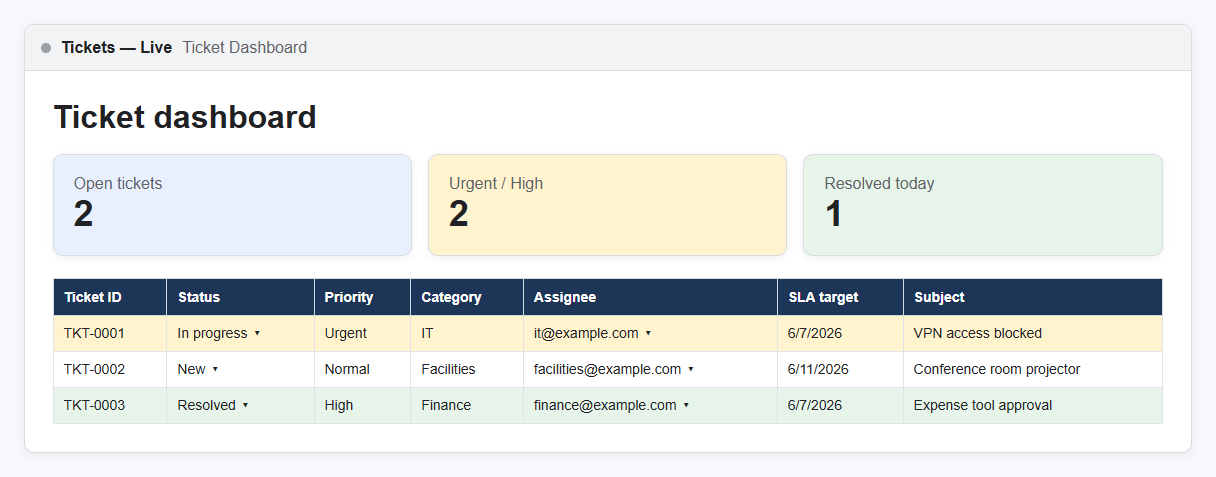
Your Sheet should look roughly like this:
Do not share the full Sheet with every requester. It may contain names, emails, attachments, HR issues, device problems, or internal notes that should not be visible to everyone.

Step 3 — Set Up Your Ticket-Tracking Dashboard
Now turn the response sheet into a queue your team can actually work from.
Start with Ticket ID. For a no-code version, put this formula in the first ticket row:
="TKT-"&TEXT(ROW()-1,"0000")
That turns row 2 into TKT-0001, row 3 into TKT-0002, and so on.
If you use the Apps Script below, the script will write the ticket ID for you. Still, the formula is useful if you want the simplest possible Google ticketing setup.
Next, create a dropdown for Status:
- New
- Triaged
- In progress
- Waiting on requester
- Resolved
- Closed
Create another dropdown for Assignee with the people or inboxes that will handle tickets.
For SLA target, keep the rules simple at first:
- Urgent: 1 day
- High: 2 days
- Normal: 5 days
- Low: 10 days
Then add conditional formatting:
- Red when the SLA target is before today and status is not Resolved or Closed
- Yellow when status is In progress
- Green when status is Resolved or Closed
You can add pivot tables later for volume by category, open tickets by assignee, and average time to resolution. Do not start there. First, make sure tickets get submitted, assigned, worked, and closed.
Step 4 — Add Email Notifications With Apps Script
Built-in Google Forms notifications can tell you that a response arrived. A real ticket workflow usually needs more than that.
You want two automatic emails:
- A confirmation email to the requester.
- A new-ticket notification to the right assignee or shared inbox.
For this, use Google Apps Script. Google’s Apps Script installable triggers documentation explains how triggers run scripts after events like form submissions. The script below uses MailApp to send email.
Open your linked Google Sheet, then go to:
Extensions → Apps Script
Delete any placeholder code and paste this script.
Before testing, update the CONFIG section with your real Sheet name, field names, team inboxes, and reply-to address.
/**
* Google Forms ticketing system automation
*
* What it does:
* - Runs when a linked Google Form submits a new row to this Sheet.
* - Creates a ticket ID.
* - Sets Status, Assignee, SLA target, and Last updated.
* - Sends an auto-reply to the requester.
* - Sends a new-ticket notification to the assigned inbox.
* - Sends a resolution email when Status changes to Resolved.
*
* Trigger 1:
* Apps Script → Triggers → Add trigger → onFormSubmit
* Event source: From spreadsheet
* Event type: On form submit
*
* Trigger 2:
* Apps Script → Triggers → Add trigger → onTicketEdit
* Event source: From spreadsheet
* Event type: On edit
*/
const CONFIG = {
sheetName: 'Form Responses 1',
// These must match the exact column headers in your linked response Sheet.
requesterEmailField: 'Email Address',
requesterNameField: 'Requester name',
categoryField: 'Category',
priorityField: 'Priority',
subjectField: 'Subject',
descriptionField: 'Description',
teamName: 'Support team',
defaultSupportInbox: 'support@example.com',
replyToAddress: 'support@example.com',
// Use 'category' for category-based routing or 'roundRobin' for rotation.
assignmentMode: 'category',
categoryAssignees: {
'IT': 'it@example.com',
'HR': 'hr@example.com',
'Facilities': 'facilities@example.com',
'Finance': 'finance@example.com',
'Operations': 'ops@example.com',
'Other': 'support@example.com'
},
roundRobinAssignees: [
'agent1@example.com',
'agent2@example.com',
'agent3@example.com'
],
ticketColumns: [
'Ticket ID',
'Status',
'Assignee',
'SLA target',
'Resolved date',
'Internal notes',
'Last updated',
'Resolution email sent'
]
};
function onFormSubmit(e) {
if (!e || !e.range) {
throw new Error('Run onFormSubmit with an installable spreadsheet trigger: From spreadsheet → On form submit.');
}
const sheet = e.range.getSheet();
if (sheet.getName() !== CONFIG.sheetName) return;
const headers = ensureTicketColumns_(sheet);
const row = e.range.getRow();
const rowData = getRowObject_(sheet, row, headers);
const namedValues = e.namedValues || {};
const requesterEmail = getSubmittedValue_(namedValues, rowData, CONFIG.requesterEmailField);
const requesterName = getSubmittedValue_(namedValues, rowData, CONFIG.requesterNameField) || 'there';
const category = getSubmittedValue_(namedValues, rowData, CONFIG.categoryField) || 'Other';
const priority = getSubmittedValue_(namedValues, rowData, CONFIG.priorityField) || 'Normal';
const subject = getSubmittedValue_(namedValues, rowData, CONFIG.subjectField) || 'New support request';
const description = getSubmittedValue_(namedValues, rowData, CONFIG.descriptionField) || '';
const ticketId = createTicketId_(row);
const assignee = chooseAssignee_(category);
const slaTarget = calculateSlaTarget_(priority);
const now = new Date();
setCellByHeader_(sheet, headers, row, 'Ticket ID', ticketId);
setCellByHeader_(sheet, headers, row, 'Status', 'New');
setCellByHeader_(sheet, headers, row, 'Assignee', assignee);
setCellByHeader_(sheet, headers, row, 'SLA target', slaTarget);
setCellByHeader_(sheet, headers, row, 'Last updated', now);
setCellByHeader_(sheet, headers, row, 'Resolution email sent', 'No');
if (requesterEmail) {
sendRequesterConfirmation_(requesterEmail, requesterName, ticketId, subject);
}
sendTeamNotification_({
ticketId: ticketId,
assignee: assignee,
requesterName: requesterName,
requesterEmail: requesterEmail,
category: category,
priority: priority,
subject: subject,
description: description,
sheetUrl: SpreadsheetApp.getActiveSpreadsheet().getUrl()
});
}
function onTicketEdit(e) {
if (!e || !e.range) return;
const sheet = e.range.getSheet();
if (sheet.getName() !== CONFIG.sheetName) return;
const row = e.range.getRow();
if (row === 1) return;
const headers = ensureTicketColumns_(sheet);
const editedHeader = headers[e.range.getColumn() - 1];
const trackedColumns = ['Status', 'Assignee', 'Priority', 'Internal notes'];
if (trackedColumns.indexOf(editedHeader) === -1) return;
setCellByHeader_(sheet, headers, row, 'Last updated', new Date());
if (editedHeader !== 'Status') return;
const newStatus = String(e.value || e.range.getValue() || '').trim();
if (newStatus !== 'Resolved') return;
const rowData = getRowObject_(sheet, row, headers);
if (String(rowData['Resolution email sent'] || '').trim() === 'Yes') return;
const requesterEmail = String(rowData[CONFIG.requesterEmailField] || '').trim();
if (!requesterEmail) return;
const ticketId = String(rowData['Ticket ID'] || createTicketId_(row));
const subject = String(rowData[CONFIG.subjectField] || 'your support request');
const notes = String(rowData['Internal notes'] || '').trim();
sendResolutionEmail_(requesterEmail, ticketId, subject, notes);
setCellByHeader_(sheet, headers, row, 'Resolved date', new Date());
setCellByHeader_(sheet, headers, row, 'Resolution email sent', 'Yes');
}
function ensureTicketColumns_(sheet) {
const headers = getHeaders_(sheet);
let lastColumn = sheet.getLastColumn();
CONFIG.ticketColumns.forEach(function(columnName) {
if (headers.indexOf(columnName) === -1) {
lastColumn += 1;
sheet.getRange(1, lastColumn).setValue(columnName);
headers.push(columnName);
}
});
return headers;
}
function getHeaders_(sheet) {
return sheet.getRange(1, 1, 1, sheet.getLastColumn()).getValues()[0];
}
function getRowObject_(sheet, row, headers) {
const values = sheet.getRange(row, 1, 1, sheet.getLastColumn()).getValues()[0];
const result = {};
headers.forEach(function(header, index) {
result[header] = values[index];
});
return result;
}
function getSubmittedValue_(namedValues, rowData, fieldName) {
if (Object.prototype.hasOwnProperty.call(namedValues, fieldName)) {
const value = namedValues[fieldName];
if (Array.isArray(value)) return value.length ? String(value[0]).trim() : '';
return String(value || '').trim();
}
return String(rowData[fieldName] || '').trim();
}
function setCellByHeader_(sheet, headers, row, headerName, value) {
const columnIndex = headers.indexOf(headerName) + 1;
if (columnIndex < 1) throw new Error('Missing column: ' + headerName);
sheet.getRange(row, columnIndex).setValue(value);
}
function createTicketId_(row) {
return 'TKT-' + ('0000' + String(row - 1)).slice(-4);
}
function chooseAssignee_(category) {
if (CONFIG.assignmentMode === 'roundRobin') {
return getRoundRobinAssignee_();
}
return CONFIG.categoryAssignees[category] || CONFIG.defaultSupportInbox;
}
function getRoundRobinAssignee_() {
const assignees = CONFIG.roundRobinAssignees.filter(function(email) {
return String(email || '').trim();
});
if (!assignees.length) return CONFIG.defaultSupportInbox;
const lock = LockService.getScriptLock();
lock.waitLock(5000);
try {
const properties = PropertiesService.getScriptProperties();
const currentIndex = Number(properties.getProperty('ROUND_ROBIN_INDEX') || 0);
const assignee = assignees[currentIndex % assignees.length];
properties.setProperty('ROUND_ROBIN_INDEX', String((currentIndex + 1) % assignees.length));
return assignee;
} finally {
lock.releaseLock();
}
}
function calculateSlaTarget_(priority) {
const key = String(priority || 'Normal').toLowerCase();
const daysByPriority = {
urgent: 1,
critical: 1,
high: 2,
normal: 5,
medium: 5,
low: 10
};
const target = new Date();
const daysToAdd = daysByPriority[key] || 5;
target.setDate(target.getDate() + daysToAdd);
target.setHours(17, 0, 0, 0);
return target;
}
function sendRequesterConfirmation_(email, name, ticketId, subject) {
const plainBody = 'Hi ' + name + ',\n\n' +
'We received your request and created ticket ' + ticketId + '.\n' +
'Subject: ' + subject + '\n\n' +
'Someone from the ' + CONFIG.teamName + ' will review it and follow up.';
const htmlBody = '<p>Hi ' + escapeHtml_(name) + ',</p>' +
'<p>We received your request and created ticket <strong>' + escapeHtml_(ticketId) + '</strong>.</p>' +
'<p><strong>Subject:</strong> ' + escapeHtml_(subject) + '</p>' +
'<p>Someone from the ' + escapeHtml_(CONFIG.teamName) + ' will review it and follow up.</p>' +
'<p>Thanks,<br>' + escapeHtml_(CONFIG.teamName) + '</p>';
MailApp.sendEmail({
to: email,
replyTo: CONFIG.replyToAddress,
subject: '[' + ticketId + '] We received your request',
body: plainBody,
htmlBody: htmlBody,
name: CONFIG.teamName
});
}
function sendTeamNotification_(ticket) {
const plainBody = 'A new support ticket was submitted.\n\n' +
'Ticket ID: ' + ticket.ticketId + '\n' +
'Priority: ' + ticket.priority + '\n' +
'Category: ' + ticket.category + '\n' +
'Requester: ' + ticket.requesterName + ' (' + ticket.requesterEmail + ')\n' +
'Subject: ' + ticket.subject + '\n\n' +
ticket.description + '\n\n' +
'Open the ticket sheet: ' + ticket.sheetUrl;
const htmlBody = '<p>A new support ticket was submitted.</p>' +
'<ul>' +
'<li><strong>Ticket ID:</strong> ' + escapeHtml_(ticket.ticketId) + '</li>' +
'<li><strong>Priority:</strong> ' + escapeHtml_(ticket.priority) + '</li>' +
'<li><strong>Category:</strong> ' + escapeHtml_(ticket.category) + '</li>' +
'<li><strong>Requester:</strong> ' + escapeHtml_(ticket.requesterName) + ' (' + escapeHtml_(ticket.requesterEmail) + ')</li>' +
'<li><strong>Subject:</strong> ' + escapeHtml_(ticket.subject) + '</li>' +
'</ul>' +
'<p><strong>Description:</strong></p>' +
'<p>' + escapeHtml_(ticket.description).replace(/\n/g, '<br>') + '</p>' +
'<p><a href="' + escapeAttribute_(ticket.sheetUrl) + '">Open the ticket sheet</a></p>';
MailApp.sendEmail({
to: ticket.assignee || CONFIG.defaultSupportInbox,
replyTo: CONFIG.replyToAddress,
subject: '[New ticket ' + ticket.ticketId + '] ' + ticket.priority + ': ' + ticket.subject,
body: plainBody,
htmlBody: htmlBody,
name: CONFIG.teamName
});
}
function sendResolutionEmail_(email, ticketId, subject, notes) {
const plainBody = 'Hi,\n\n' +
'Your ticket ' + ticketId + ' has been marked as resolved.\n' +
'Subject: ' + subject + '\n' +
(notes ? '\nResolution notes:\n' + notes + '\n' : '') +
'\nIf this is not resolved, reply to the support team and we will reopen it.';
const notesHtml = notes
? '<p><strong>Resolution notes:</strong><br>' + escapeHtml_(notes).replace(/\n/g, '<br>') + '</p>'
: '';
const htmlBody = '<p>Hi,</p>' +
'<p>Your ticket <strong>' + escapeHtml_(ticketId) + '</strong> has been marked as resolved.</p>' +
'<p><strong>Subject:</strong> ' + escapeHtml_(subject) + '</p>' +
notesHtml +
'<p>If this is not resolved, reply to the support team and we will reopen it.</p>' +
'<p>Thanks,<br>' + escapeHtml_(CONFIG.teamName) + '</p>';
MailApp.sendEmail({
to: email,
replyTo: CONFIG.replyToAddress,
subject: '[' + ticketId + '] Your ticket has been resolved',
body: plainBody,
htmlBody: htmlBody,
name: CONFIG.teamName
});
}
function escapeHtml_(value) {
return String(value || '')
.replace(/&/g, '&')
.replace(/</g, '<')
.replace(/>/g, '>')
.replace(/"/g, '"')
.replace(/'/g, ''');
}
function escapeAttribute_(value) {
return escapeHtml_(value).replace(/`/g, '`');
}
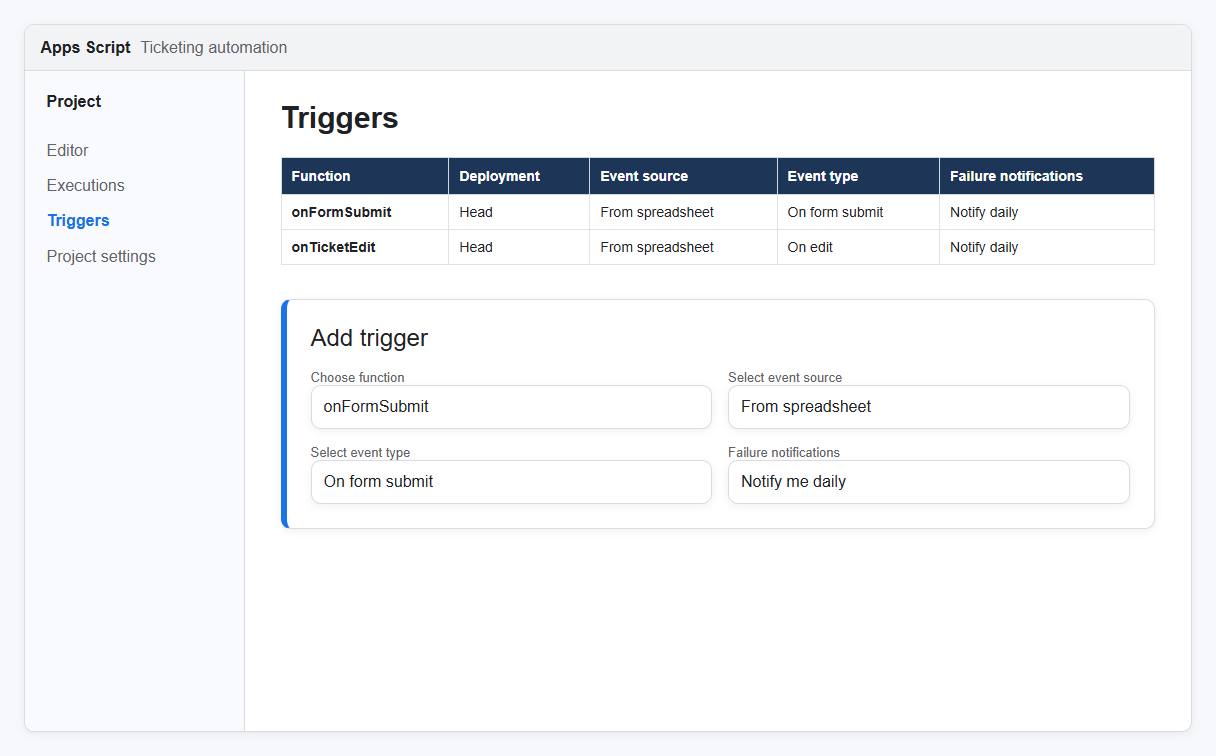
Now install the triggers.
In Apps Script, click Triggers in the left sidebar, then Add trigger.
For the first trigger:
- Choose which function to run: onFormSubmit
- Choose which deployment should run: Head
- Select event source: From spreadsheet
- Select event type: On form submit
For the second trigger:
- Choose which function to run: onTicketEdit
- Choose which deployment should run: Head
- Select event source: From spreadsheet
- Select event type: On edit
Save each trigger and authorize the script.
Submit a test ticket through the form. You should see:
- A new row in the Sheet
- A ticket ID
- Status set to New
- An assignee based on category or round-robin assignment
- An SLA target
- A confirmation email to the requester
- A notification email to the assignee or support inbox
Check Google’s Apps Script quotas page before using this for high-volume support. Every ticket can send two or more emails, and quota limits depend on account type.
Step 5 — Set Up Basic Triage and Assignment
Automation gets tickets into the Sheet. Triage keeps the system useful.
At least once or twice a day, someone should review new tickets and update three fields:
Status
Move the ticket from New to Triaged or In progress.
Assignee
Confirm that the right person or inbox owns the request.
Priority
Fix anything the requester mislabeled. People often choose High when they mean Normal.
For a small team, this can be a 10-minute routine:
- Morning: review new tickets, assign owners, flag urgent items.
- Afternoon: check overdue tickets and waiting-on-requester items.
- Friday: close resolved tickets and look for repeat issues.
The script above supports category-based routing. IT tickets can go to IT, HR tickets can go to HR, and facilities tickets can go to the facilities inbox.
For round-robin assignment, change this line:
assignmentMode: 'category',
to this:
assignmentMode: 'roundRobin',
Then update the roundRobinAssignees list.
For a no-code version, use a formula in the Assignee column:
=IF(D2="IT","it@example.com",IF(D2="HR","hr@example.com","support@example.com"))
That is less flexible than the script, but it works for a very small Google ticket system.
This is where many DIY systems start to wobble. Forms can collect requests. Sheets can display them. The hard part is ownership: who has the ticket, what happens next, and how you prevent quiet tickets from sitting untouched for days.
Step 6 — Track Status and Close the Loop
A ticket is not finished just because it landed in a spreadsheet.
Use the Status column as the source of truth:
- New means nobody has triaged it yet.
- Triaged means someone reviewed it and knows what needs to happen.
- In progress means someone is working on it.
- Waiting on requester means the team needs more information.
- Resolved means the work is done and the requester has been told.
- Closed means no further action is expected.
The script above sends a resolution email when someone changes the Status column to Resolved. It also writes a resolved date and marks “Resolution email sent” as Yes so the requester does not get duplicate emails.
Use the Last updated column to see which tickets have gone stale. The script updates that field when Status, Assignee, Priority, or Internal notes changes.
A common no-code trick is to use:
=NOW()
That is fine for a live “current time” display, but it is not a permanent timestamp. NOW() recalculates, so do not use it as your only record of when a ticket was updated or resolved.
If a ticket is waiting on a requester for more than a few days, follow up manually or close it with a clear note. A messy close process is how old tickets turn into a graveyard.
Optional — Make It Look More Professional
A little polish helps people trust the system.
Add your company logo to the form. Use a plain title. Keep the description short. If the form supports multiple departments, explain which requests belong there and which do not.
Embed the form where employees already look for help:
- Internal wiki
- Google Site
- Notion page
- Employee handbook
- School staff portal
- Operations page
You can also create a simple ticket portal in Google Sites. It does not need much:
- Submit a request
- What information to include
- Expected response times
- Common fixes
- Support policy
Do not publish the full ticket Sheet as a requester portal. That exposes too much information. If people need to check ticket status regularly, that is usually a sign you are ready for something more purpose-built.
A Free Google Forms Ticketing System Template
Use this copyable template to start faster:
Make a copy of the Google Forms ticketing system template.
The template should include:
- A Google Form with requester name, email, category, priority, subject, description, and attachment fields
- A linked Google Sheet named “Tickets — Live”
- Ticket tracking columns
- Status dropdowns
- Assignee dropdowns
- Conditional formatting
- The Apps Script from this article
- Trigger setup instructions in a README tab
Before sharing the template with your team, submit at least five test tickets:
- A normal IT request
- An urgent request
- A request with an attachment
- A request with optional fields left blank
- A request that gets marked Resolved
Check the ticket ID, assignee routing, SLA target, requester confirmation email, team notification, and resolution email.
Templates are useful because they save setup time. Testing is what keeps a free template from becoming support debt.
Limitations — When Google Forms Stops Being Enough
Google Forms is a real starting point. It is not a forever system.
Here is a practical rule of thumb.
Under about 30 tickets per week: this setup usually works fine. One person can triage the Sheet, assign work, and clean up old tickets.
Around 75 to 100 tickets per week: it gets clunky. Filters break. People miss updates. Requesters ask for status. The Sheet becomes something people avoid until there is a problem.
Above 100 tickets per week: you are probably spending too much time maintaining the workaround.
Team size matters too.
For 1 to 3 agents, a Sheet can work. Everyone can see the queue, and ownership is still manageable.
At 5 or more agents, assignment and visibility start to fall apart. Two people may work the same ticket. Someone may change a status without telling the requester. Notes may end up split across email, chat, and the Sheet.
Workflow is the next limit. Google Forms does not give you real SLA management, private internal comments, agent collision warnings, approval flows, audit logs, asset linking, or reliable reporting beyond Sheets and pivot tables.
Requester experience is limited too. Users can submit a ticket, but they cannot easily log in and view all their open requests unless you build another layer or share data you probably should not share.
Security and compliance are the final concern. This is not the right setup for regulated workflows, sensitive HR cases, customer data, or anything that needs role-based access control and a clear audit trail.
For small internal teams, a Google trouble ticket system built from Forms and Sheets can be enough. For mature support operations, it becomes a liability.
If you are comparing no-cost options more broadly, see free ticketing system.
What to Do When You’ve Outgrown the Forms-Based Setup
When the Forms setup starts to strain, you have a few honest options.
Stay free, get more control: use an open-source self-hosted tool like osTicket. You get more help desk structure, but you also own hosting, updates, and maintenance.
Move to customer support software: Zendesk or HubSpot Service Hub can make sense when most requests come from customers and need external support workflows.
Move to IT service software: Freshservice can make sense when IT needs to request catalogs, assets, SLAs, approvals, and service desk reporting.
Move support into Slack: Suptask can fit teams that already handle internal requests in Slack and want tickets, triage, and resolution to stay where the conversation starts.
For a broader comparison, use the best ticketing system roundup instead of turning this Google Forms tutorial into an alternatives list.
The question is not “Can Google Forms do one more thing?” It probably can.
The better question is: “Is this still saving us time?”
Final Thoughts
A Google Forms ticketing system is a practical first step. It gives you one intake form, one ticket log, simple email notifications, and enough structure to stop losing requests. Just be honest about what it is. Forms are great for intake. Sheets are fine for a small queue.
Apps Script can handle basic automation. Once tickets pile up, ownership gets fuzzy, or requesters need better visibility, it is time to look at stronger options. Start with the best ticketing system roundup when you reach that point.
FAQs
Can I Use Google Forms as a Ticketing System?
Yes. Google Forms can work as a ticketing system for small teams with simple request tracking needs. The best setup is a Form for intake, a linked Sheet for the ticket log, and Apps Script for email notifications. It works well at low volume, but it is not a full help desk replacement.
How Do I Send Automatic Email Replies From Google Forms?
Connect the form to Google Sheets, open Apps Script from the Sheet, and create an installable form-submit trigger. The script can send a confirmation email to the requester and a notification to your team. Test it with sample tickets before using it with real employees or customers.
Can Google Forms Assign Tickets Automatically?
Google Forms cannot assign tickets by itself, but Apps Script can. You can route tickets by category, priority, or a simple round-robin list. For example, IT tickets can go to an IT inbox and HR tickets can go to HR. The more complex the routing gets, the harder it is to maintain.
What Is the Difference Between Google Forms and a Real Help Desk?
Google Forms captures structured requests. A real help desk manages the full ticket lifecycle: assignment, SLAs, internal notes, requester updates, reporting, permissions, audit history, and team queues. Forms are useful for intake. A help desk is better when multiple people need to manage tickets every day.
How Many Tickets Can a Google Forms System Handle?
As a practical rule, it works well under about 30 tickets per week. Around 75 to 100 tickets per week, the sheet usually becomes clunky. Above 100 tickets per week, most teams need stronger assignment, reporting, requester communication, and workflow controls than Forms and Sheets can comfortably provide.
Can I Use This as a Google Trouble Ticket System for IT?
Yes. It can work as a simple Google trouble ticket system for small IT teams. Use categories like hardware, software, access, network, and security. Add priority rules and assignees so the Sheet becomes more than a list of complaints. For formal IT service management, use a dedicated ticketing tool.